The neck clamp assembly, like all other mechanical parts, will wear with continued use, thus requiring routine maintenance and eventually replacement. DSI strongly advises proper maintenance and adjustment of these assemblies. DSI uses a fixture which is representative of the bottom of the SL-17 to adjust all new neck clamps before they leave DSI. This same fixture can be applied for reshaping used and deformed neck clamps. Please keep in mind that there are limits regarding the restoring of used (or abused) parts. If there is any question regarding the condition of the neck clamp, it may be taken to a DSI dealer who can send it on to DSI for factory inspection.
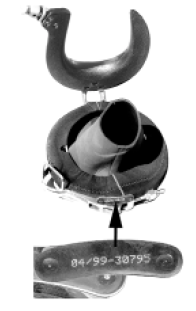
Beginning in April of 1999, neck clamp assemblies are manufactured with a date of production and certificate number engraved directly onto the part. Every neck clamp is N.D.T. (nondestructive testing) tested to A.W.S. standard D1.1. DSI strongly suggests that you have your neck clamps tested to this specification every five years or more often if there is any doubt regarding the integrity or function of the part. Please call your local welding supplier to locate the nearest N.D.T. testing laboratory, as DSI does not have facilities available to offer this service. If testing is not an option available to you, DSI recommends replacing the neck clamp assemblies at a minimum of every five years. Note: The potential of possible failure of the neck clamp increases when the neck clamp is not properly adjusted. This is especially true with use of any drysuit dams. If you use any neck seal other than the standard DSI neck dams, YOU MUST RE-ADJUST YOUR NECK CLAMP ASSEMBLY FOR PROPER OPERATION! Before every dive, your equipment must be completely checked for any damage or wear. Even normal wear & aging will eventually result in the need to replace parts. Any abnormal condition of any component requires the removal and replacement of the component.
If any part doesn't look right, don't use it.
All metal parts should be inspected for cracks or corrosion and replaced immediately if this type of damage is found. While some surface rust or corrosion is to be expected, severe corrosion can lead to the eventual failure of the part.
(i.e. welding, cutting, and burning, contaminated waters) or other practices that can degrade the metal components of the neck clamp. These clamps should be visually inspected prior to each dive as part of the pre-dive check of the helmet. This pre-dive inspection is done with the neck dam fabric/rubber in place. All neck clamps should be visually inspected at least on a semi-annual basis in detail with the neck dam fabric removed so all welds can be visually inspected for signs of cracking or damage. Neck clamps kept in service after 5 years should be inspected more frequently. Additionally, the three pins and clevis welds should be carefully inspected, as well as the adjustment stud. All metal parts should be carefully inspected for signs of wear or damage. The stainless nylon lock nut will wear out over time and will require replacement. If any other metal components appear worn or damaged the neck clamp must be replaced. This inspection is considered the minimum. The use of other non-destructive test methods such as dye penetrate testing can be used to validate suspected damage.
Neck clamp assemblies which are bent or deformed due to misadjustment or accidental damage may be returned to DSI, via your local dealer, for possible repair. Users must keep in mind that there are limits to restoring used or abused parts. DSI uses a fixture that resembles the bottom of a SL 17A/B to adjust all new neck clamps and this same fixture can often be used to reshape bent or deformed neck clamps. If there is any question regarding the condition of the neck clamp, don't use it. Suspected worn or damaged neck clamp assemblies should be taken to a DSI dealer to be sent on to DSI for a factory inspection.
The following procedure is designed to help identify degradation of neck clamp components before the degradation poses a threat to the user. It should be preformed daily before the start of dive operations or any time that the diver is changed. This is especially true if each diver does not have his or her own neck dam/yoke assembly. Diving Systems highly recommends that a neck dam/yoke assembly for each diver or at least of each neck dam size be available during dive operations with multiple divers using the same helmet. An ill fitting, wrong size neck dam can pose a serious hazzards to the diver. Also, a backup neck dam yoke assembly is insurance against down time due to a damaged neck clamp.
Neck Clamp and Yoke Assembly Pre-Dive Inspection: (Refer to the illustrations for reference).
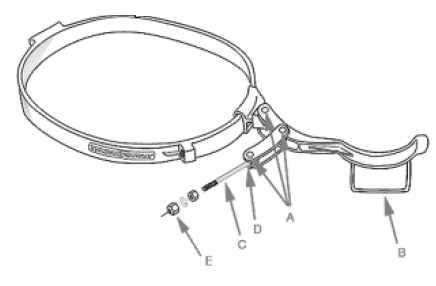
Visually inspect the moving parts of the clamp assembly including the three pins (A) in the over- center lever assembly, and the three clevis blocks. Visually inspect for bent or broken pins or a bent or broken handle and locking bail (B).
Check to ensure the adjustment stud (C) is not bent or damaged. Visually inspect the welded area (D) around the base of the stud for signs of stress or weld cracking.
On the Yoke, check that the screws (1) holding the Latch Catch Assembly are tight. Check to ensure the latch catch mechanism functions smoothly. Ensure the safety pin is present and attached by a lanyard
Check to make sure the rear hinge tab is secured tightly to the clamp foundation. This can be checked by wiggling the yoke back and forth sideways (M) to ensure it and the hinge are securely tightened to the hinge tab and the hinge tab is secured to the clamp. If there is a slop in this movement, first check to ensure the brass hinge is firmly attached to the yoke assembly (2) and the two bolts (3) are installed securely to the brass hinge. If these are tight, the hinge tab to clamp screws may be loose. To tighten these screws you must remove the two bolts (3) holding the brass hinge to the clamp and remove the yoke & hinge from the clamp. The screws may be accessed by pushing the neck dam neoprene (4) to the side. After tightening the screws, remount the yoke & hinge using the two bolts. You must use Locktite® on the bolts (3) when reinstalling them.
Check the condition of the neoprene or rubber neck dam for wear and deterioration, replace if necessary.
Check fit and adjustment of the neck clamp by installing the clamp on the helmet, ensuring that the clamp is seated properly over the o-ring area of the helmet. When closing the lever, the lever should get tight at the mid-point of travel, and once the lever is past the mid-point of travel, the clamp should close easily. DO NOT FORCE THE CLAMP SHUT! If it does not close as described, you MUST adjust the clamp by loosening the adjustment locking nut (E). From the closed position if you pull out on the lever approximately 1-2 inches, the lever should snap closed when released.
As the neck dam ages it compresses and the clamp must be adjusted by tightening the adjustment locking nut (E) so that the clamp operates as described above.

The stainless steel nylon lock nut (E) will require periodic replacement as the nylon insert wears out due to the periodic adjustments to the clamp that MUST be made as the neck dam ages or you change to a dry suit mount. YOU SHOULD NEVER HAVE TO FORCE THE CLAMP SHUT!
Proper adjustment of the neck clamp should place the bail squarely in the groove of the latch catch body when the clamp is closed.