Diving Systems International would like to notify users and owners of the SuperLite 17C and 27 style diving helmets that there has been a change to the helmet specifications.
Both the 17C and the 27 have two sealed pull pin assemblies (Part Number 505-110) that lock the locking collar in place. The pin/body is filled with silicone oil. The pin/ body is sealed at both ends of the body by two large O- rings.
The material used for the O-rings in the sealed pull pins has been changed from rubber to silicone. This change has been made to improve the sealing of the pins, as some pins have been found to slightly leak silicon fluid due to O-ring shrinkage. The silicone O-rings have superior sealing characteristics when used with silicone oil. If any leakage of the silicon fluid is found, the pins should be changed. Diving Systems International will replace the rubber O- rings with the new silicone O-rings free of charge for one year from the date of this notice. If you wish to have this done, please take the helmet to the nearest authorized DSI dealer. The dealer will change out the both of the pull pin assemblies and install replacement assemblies which use the silicone O-rings. If there is not a dealer nearby the user may remove the sealed pull pins (see this sheet for instructions) and send them to DSI. DSI will replace the rubber O-rings with silicone O-rings and return the pins to the user as quickly as possible.
Sealed Pull Pin Assembly
DSI # 505-101
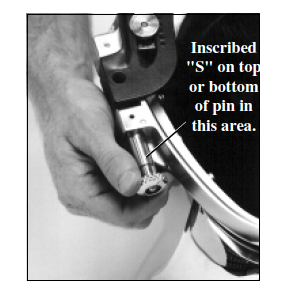
All updated pins have a small "S" inscribed on the pin body near the knob end of the pin when it is installed in the helmet. All the helmets sold before 2-15-95 (or with the following serial numbers) may be upgraded. Serial numbers 0001 to 0100, 20019 to 20949, 30019 and 40019 to 40919 unless there is an "S" already inscribed on to the body. If there is an "S" the pins have already been changed.
Diving Systems does not believe that the rubber O- rings are unsafe, and this change is not mandatory for the users and owners of the SuperLite 17C and 27 diving helmets.
6.4.2 Sealed pull pin (123) removal Tools Required: 9/64 inch Allen wrench attachment on a torque screwdriver Loctite® 222 Threadlocker
1) Remove the front screws (59), one on each side of the helmet ring.
2) Remove the sealed pull pins (123), one on each side. Fig. 6.10 - Remove the screws that hold the sealed pull pins. Fig. 6.11 - Remove the sealed pull pins.
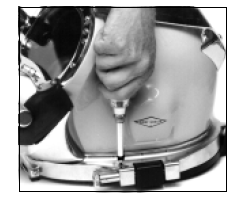
Remove the screws that hold the sealed pull pins.
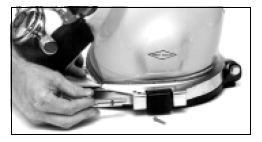
Remove the sealed pull pins.
3) Clean parts and remove any sand or grit. Clean out the slots where the pins enter the helmet ring. Ensure there is no grit or sand trapped inside that may interfere with the replacement of the pins.
4) Do not attempt to open or repair the sealed pull pins (123). These parts are factory assembled, filled with silicon fluid, and sealed. Replace the entire unit if not working correctly. Tools Required: 9/64 inch Allen wrench attachment on torque screwdriver Loctite® 222 Threadlocker.
1) Install the sealed pull pins (123) into the helmet neck ring with the slots in the pins oriented to accept the screws and with the knob ends facing forward. Make sure the beveled end (opposite end from the knob end) of the pins are on the down side, NOT THE UP SIDE. WARNING/DANGER If these pins are installed upside down, the locking collar/ neck pad assembly (169) will not lock the helmet to the diver’s head. This could cause the helmet to dislodge from the diver. This could be fatal.

2) The threads of the two screws (59) should receive an application of Loctite® 222 Threadlocker prior to tightening.
3) Install the screws (59) in the holes and tighten to required torque. (see Appendix 1)
4) Rotate the sealed pull pins (123) to the locking position with the locking collar (157) open. Close the locking collar against the helmet ring. The sealed pull pins should spring open when the locking collar presses against then, and lock into the receiving holes in the locking collar when it is fully closed. If the locking collar does not fully close, check to make sure that both of the sealed pull pins are installed properly and locked. Fig. 6.12